Salesforce LWC 익히기
Part 1. LWC 개념 및 컴포넌트 파일 / (240416)
Part 2. LWC 실습 - 조건부 렌더링, 여러 템플릿 렌더링 등 / (240417)
Part 3. 외부 자바스크립트 파일을 LWC를 통해 적용하기 - Static Resources / (240418)
Part 1. LWC 개념 및 컴포넌트 파일
- Lightning Web Component( LCW )는 HTML 및 최신 JavaScript를 사용하여 작성된 사용자 정의 HTML 요소
- 컴포넌트는 기본적으로 폴더로 구분되며 폴더와 파일이름은 대문자와 밑줄을 포함하여 동일한 이름이어야 합니다
- 파일 EX) Component HTML 파일, Component JavaScript 파일, Component Config 파일, Component CSS 파일
*참고사이트
1) Trailhead module - Lightning Web Components Basics
2) Lightning Web Components Developer Guide
2) LWC Components
https://developer.salesforce.com/docs/component-library/overview/components LWC 코드를 작성하고 실행해 볼 수 있습니다.
Part 2. LWC 실습 - 조건부 렌더링, 여러 템플릿 렌더링 등
조건부 렌더링을 하기 위해서는 <template> 안에 또 <template> 를 만들거나, 일반 태그를 추가하고 if:true|false={...} 로 표기. 그러면 if:true 일 경우에는 {…} 값이 true일 경우 렌더링 되고, if:false 일 경우에는 {…} 값이 false일 경우 렌더링 .
/* rendering.js */
import { LightningElement, track } from 'lwc’;
export default class Rendering extends LightningElement {
   @track isVisible = false;
   handleChange(e) {
        this.isVisible = e.target.checked;
   }
}
목록 반복 렌더링
반복 렌더링을 하는 방법은 for:each와 iterator:iteratorName 두 가지 방법이 있습니다.
어떤 반복문을 사용하는지에 관계없이 key 값을 넣어서 고유 ID를 할당. 목록이 변경되면 key를 사용하여 변경된 항목만 다시 렌더링 하여 템플릿 성능을 최적화하며, 실행시 DOM에 반영되지 않습니다. 또한 key 값을 넣지 않으면 오류가 발생.
for:each
for:each={array}로 반복 시킬 데이터를 가져오고, for:item=“…“를 통해 각 아이템에 접근합니다. for:index=“…“로 인덱스 값을 받아올 수도 있습니다. 하지만 index값을 key값으로 설정할 수 없습니다.
<!-- contacts.html -->
    <template>
        <ul>
            <template for:each={contacts} for:item="contact" for:index="index">
                <li key={contact.Id}>
                    {index} : {contact.Name} , {contact.Title}
                </li>
            </template>
        </ul>
    </template>
<!-- contacts.js -->
import { LightningElement, track } from 'lwc';
export default class Contacts extends LightningElement {
@track contacts = [
{
Id : 1,
Name : "Kevin",
Title : "Publisher"
},
{
Id : 2,
Name : "Test",
Title : "LWC"
}
];
}이 부분은 한번 따라서 실습해보기
여러 템플릿 렌더링 Render Multiple Templates
 // multipleRender.js
    import { LightningElement, track  } from 'lwc';
    import templateOne from './templateOne.html';
    import templateTwo from './templateTwo.html';

    export default class MultipleRender extends LightningElement {
        @track templateOne = true;
        render() {
            return this.templateOne ? templateOne : templateTwo;
        }
        switchTemplate() {
            this.templateOne = this.templateOne = true ? false : true;
        }
    }
// multipleRender.js
import { LightningElement, track } from 'lwc';
import templateOne from './templateOne.html';
import templateTwo from './templateTwo.html';
export default class MultipleRender extends LightningElement {
@track templateOne = true;
render() {
return this.templateOne ? templateOne : templateTwo;
}
switchTemplate() {
this.templateOne = this.templateOne = true ? false : true;
}
}
https://developer.salesforce.com/docs/platform/lwc/guide/create-render.html
Render Multiple Templates | Create Lightning Web Components | Lightning Web Components Developer Guide | Salesforce Developers
Render Multiple Templates You may want to render a component with more than one look and feel, but not want to mix the HTML in one file. For example, one version of the component is plain, and another version displays an image and extra text. In this case,
developer.salesforce.com
<실습>

Part 3. 외부 자바스크립트 파일을 LWC를 통해 적용하기
세일즈포스는 외부의 자바스크립트 파일을 사용할 수 없게끔 되어 있으나 차트 등을 자바스크립트로 만들어서 가져와 LWC를 통해 세일즈포스에 적용할 수 있습니다.
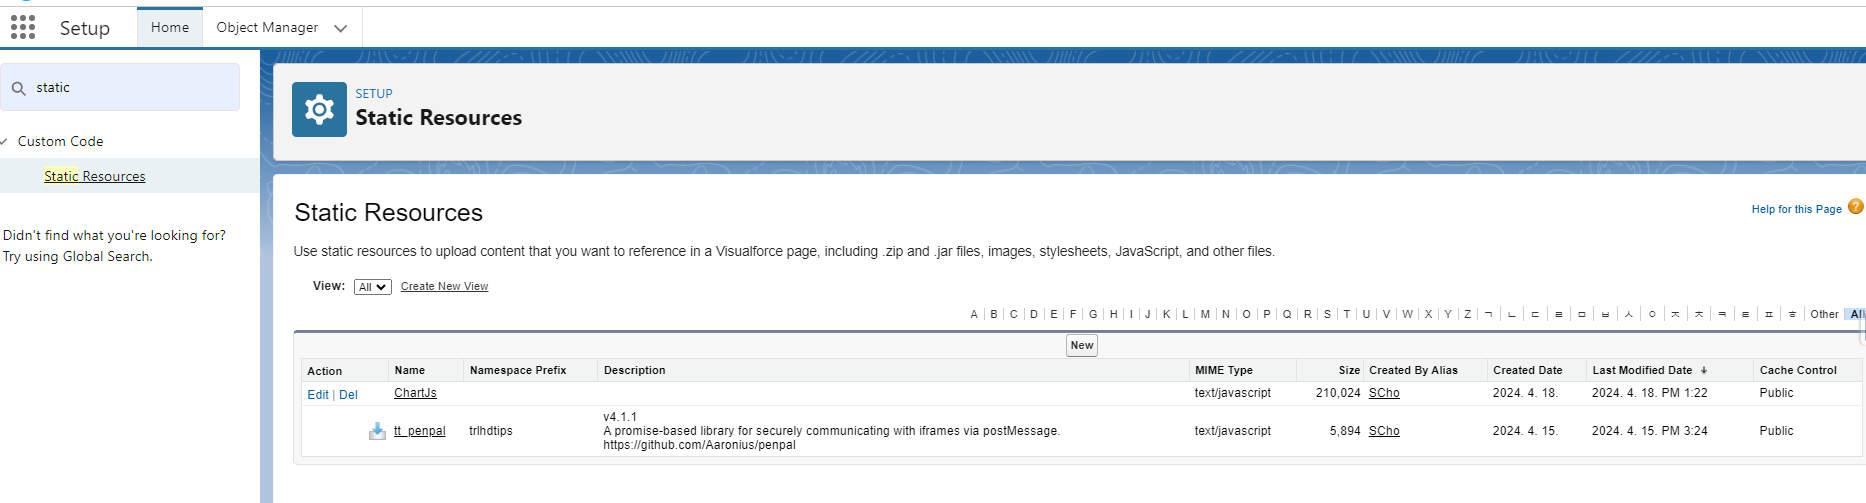
1. Salesforce Setup 에서 해야 할 일
외부에서 작업한 JS파일을 준비한다.


Salesforce SETUP 에서 'Static Resources' 로 들어가서 'NEW' 버튼 누르기
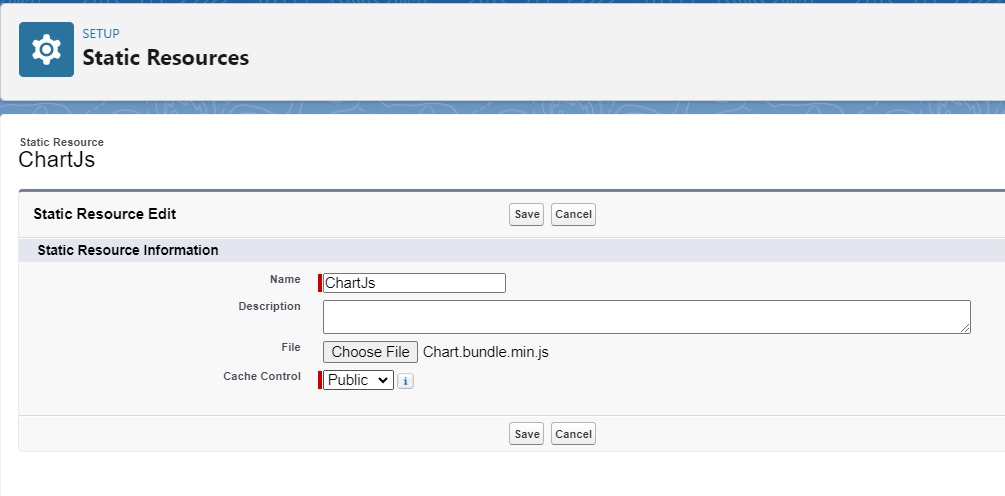
Name : ChartJs
File : Chart.bundle.min.js 파일 선택
Cache Control : Public
위 내용으로 입력하고 'Save'
2. VS코드에서 해야 할 일
'ctrl + shift + p' 를 눌러 SFDX: Create Lightining Wep Component 선택 > 'chartTest' 입력 후 엔터

만들어진 파일에 기존에 준비한 chartTest 폴더에 있는 코드를 복사한다.
주의할 점은 아래 Line2 와 같이'@salesforce/resourceUrl/ChartJs' 맨 뒤에 위치한 ChartJs는 Setup의 Static Resources에서 생성한 Name과 동일해야 한다.

필요한 부분을 잘 넣고 배포!
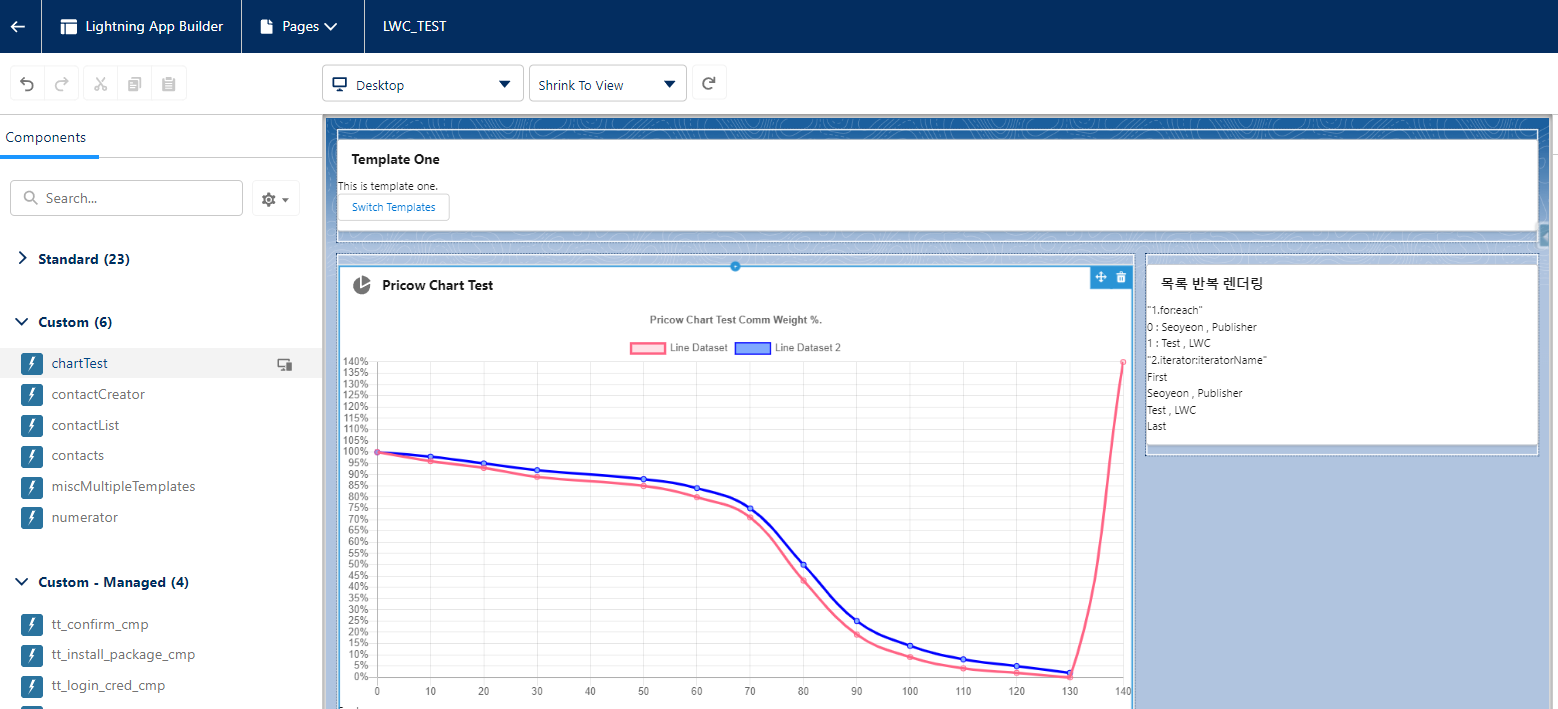
배포 후 Setup의 Lightning App Builder 에서 보여주기를 원하는 페이지 Edit
왼쪽 Components 사이드바에 Custom 부분에 chartTest 가 생성된 것을 볼 수 있다.
오른쪽 화면으로 끌고 오면 아래와 같이 js파일이 적용된 것을 확인할 수 있다.